图像物体检测与描述
Florence-2-large是微软出品的开源多功能图像标记模型,可以辅助标记图像内容、生成图像描述、识别目标等。
得益于大模型架构,Florence-2还支持使用提示词定向标记图中特定对象。
Gitee AI的Serverless API服务 优化并提供了该模型开箱即用的API,将繁杂的功能整合为更易使用的接口。
您可以通过界面快速体验接口能力。下面将基于代码调用介绍该接口的能力。
该模型仅支持英文输入输出,因此无论是输入的提示词还是识别的内容和输出的结果都将是英文的,任何其它语言的信息都会导致模型出现无法预计的输出结果。
准备工作
首先获取你的API Key,然后可定义请求函数如下。
接口的使用以Python代码为例,下面将分别演示“图像描述”与“目标识别”两个功能项的使用方法。在开始前先定义请求函数如下:
import requests

headers = {
    "Authorization": "Bearer <your api token>",
}

#用于请求图像描述的url
url_caption = "https://ai.gitee.com/v1/images/caption"
#用于请求目标识别的url
url_object_detection = "https://ai.gitee.com/v1/images/object-detection"

def query(url, payload):
	files = {
		"image": (payload["image"], open(payload["image"], "rb"))
	}
	data = {key: payload[key] for key in payload if key not in files}
	response = requests.post(url, headers=headers, files=files, data=data)
	return response.json()
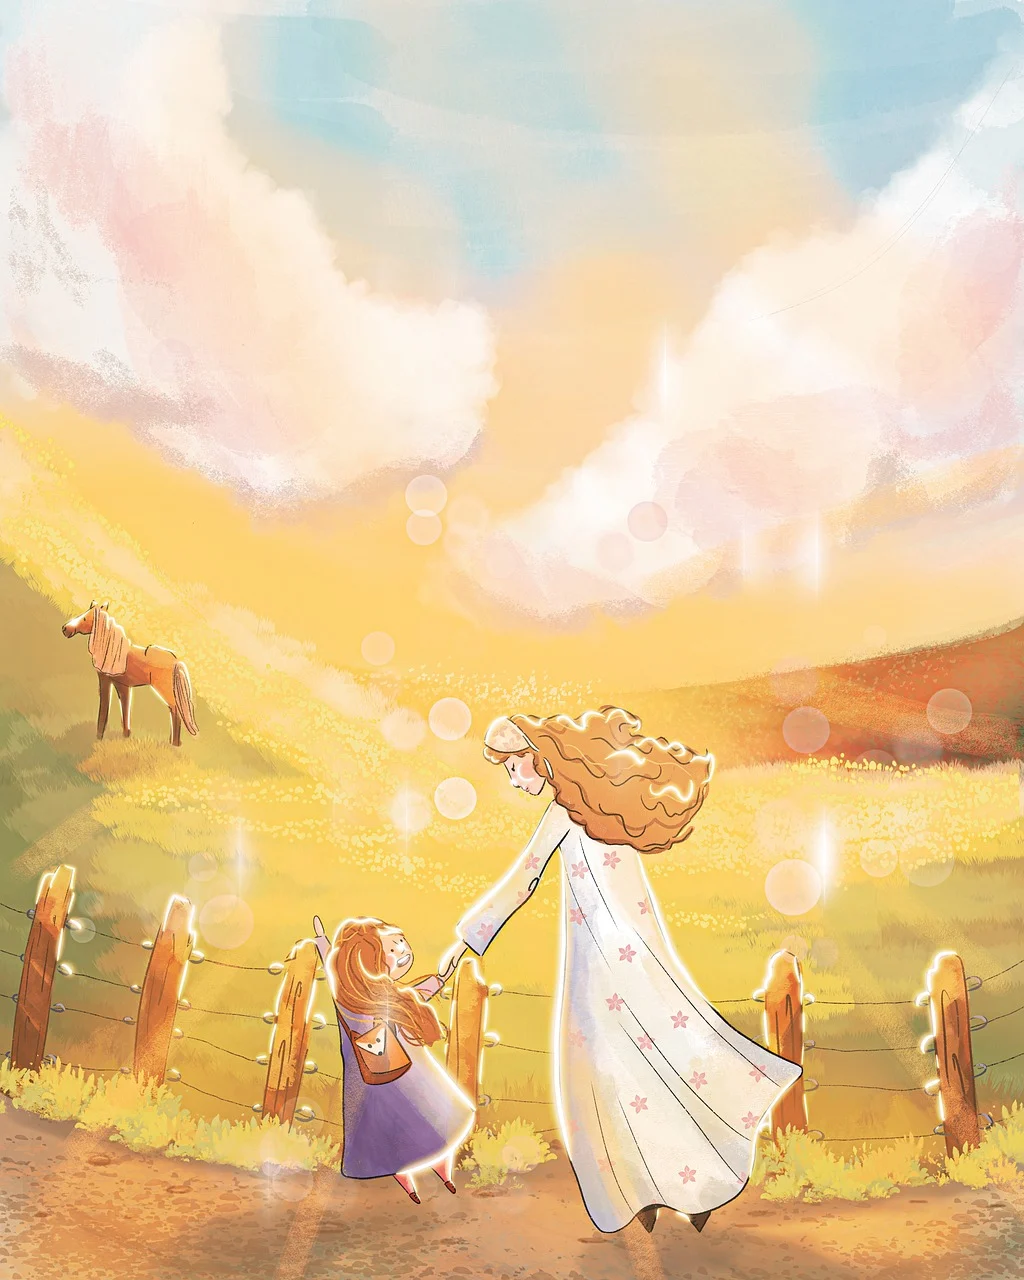
下文中使用的图片示例为:
1. 图像描述生成
该功能可以获取用户输入的图片的自然语言描述。 使用上文的query函数,发起请求如下:
output = query(url_caption, {
    "model": "Florence-2-large",
    "image": "path/to/image.jpg",
    "caption_level": 0
})
请求参数说明:
image:需要进行描述的图片,仅支持输入一张图片。caption_level:需要描述图片的详细程度,支持0、1、2三个等级,等级越高则描述得越详细,输出的字数越多。等级可根据需求进行调整,若不填写则采用默认等级0。
设置 caption_level=0时输出如下:
A woman and a little girl walking down a dirt road.
设置 caption_level=1时输出如下:
The image shows a woman and a little girl walking down a dirt road, hand in hand, with a horse in the background. The sky is filled with clouds and the ground is covered with lush green grass. The image is animated, giving it a whimsical feel.
设置 caption_level=2时输出如下:
The image is an illustration of a mother and daughter walking hand in hand in a field. The mother is wearing a long white dress with pink flowers on it and has long blonde hair. She is holding the hand of the daughter, who is also wearing a purple dress. They are both smiling and appear to be enjoying each other's company. In the background, there is a fence with wooden posts and a horse grazing on the grass. The sky is filled with fluffy white clouds and the sun is shining brightly, creating a warm glow. The field is covered in yellow flowers and there are hills in the distance. The overall mood of the image is peaceful and serene.
从结果中可以直观的感受到caption_level级别越高,描述结果越详细,您可根据需求选择不同的等级。
2. 目标识别
该功能通过在请求中输入一张图片,获得该图片主体目标的标签和位置信息。
与传统的目标识别不同的是,大模型的目标识别不提供标签的置信度,每个结果都是确定的。但是大模型支持输入提示词参数 prompt进行辅助,并且能有更详细的标签描述,不需要提前预置标签。
以是否输入 prompt作为区分,该功能可分为"传统目标识别"和“指令目标识别”
2.1 传统目标识别
该识别方法类似传统的目标识别任务,能够响应标签与目标矩形的坐标。基于该方法的请求代码如下:
代码中仅使用 image和 caption_level两个参数:
image:需要进行描述的图片,仅支持输入一张图片。caption_level:需要描述图片的详细程度,支持0、1两个个等级,等级越高则描述得越详细,输出的字数越多。等级可根据需求进行调整,若不填写则采用默认等级0。
使用如下的请求代码:
output = query({
    "model": "Florence-2-large",
    "image": "path/to/image.jpg",
    "caption_level": 0
})
请求结果格式如下:
{
	"num_objects": int,
	"objects":[
		{
			"label": str,
			"bbox": [x1, y1, x2, y2]
		}, ...
	]
}
是一个json格式,详细说明如下:
num_objects:识别到图中目标的数量。objects:一个数组对象,数组中的每个对象包含了每个目标的标签和位置。label:该目标的标签信息。bbox:该目标的位置,是一个四元组,可两两分组为(x1,y1), (x2,y2),分别表示矩形框左上角和右下角的坐标。 我们使用相同的示例图片。
设置 caption_level=0时输出如下:
{
  "num_objects": 5,
  "objects": [
    {
      "label": "animal",
      "bbox": [
        58.880001068115234, 598.3999633789062, 201.21600341796875,
        748.1599731445312
      ]
    },
    {
      "label": "girl",
      "bbox": [
        321.0240173339844, 914.5599975585938, 478.72003173828125,
        1203.8399658203125
      ]
    },
    {
      "label": "human face",
      "bbox": [
        501.2480163574219, 753.2799682617188, 545.280029296875,
        795.5199584960938
      ]
    },
    {
      "label": "human face",
      "bbox": [
        379.39202880859375, 929.9199829101562, 414.2080078125, 977.2799682617188
      ]
    },
    {
      "label": "woman",
      "bbox": [
        427.52001953125, 700.7999877929688, 804.35205078125, 1238.4000244140625
      ]
    }
  ]
}
设置 caption_level=1时输出如下:
{
  "num_objects": 4,
  "objects": [
    {
      "label": "girl in white dress with pink flowers in field at sunset",
      "bbox": [
        427.52001953125, 700.7999877929688, 805.3760375976562,
        1238.4000244140625
      ]
    },
    {
      "label": "girl with red hair and blue dress in field with wooden fence",
      "bbox": [
        311.8080139160156, 914.5599975585938, 479.7440185546875,
        1203.8399658203125
      ]
    },
    {
      "label": "brown horse with blonde mane and tail in field",
      "bbox": [
        58.880001068115234, 598.3999633789062, 201.21600341796875,
        748.1599731445312
      ]
    },
    {
      "label": "human face",
      "bbox": [
        501.2480163574219, 753.2799682617188, 545.280029296875,
        795.5199584960938
      ]
    }
  ]
}
值得注意的是,设置不同的 caption_level可能会出现完全不同的识别结果。
上文结果中,<u>等级0识别出的物体数目要多于等级1的</u>,等级1识别出的物体的描述要比等级0的更加详细。
这是因为等级越高,描述得更加详细,模型越倾向于寻找复杂的物体,目标的描述的更复杂,描述质量更高。 换句话说,等级越低,模型越偏向于选择简单的目标,描述更加简短,结果中的物体会更多。因此,您可以根据这样的经验选择合适的参数进行目标识别。
2.2 指令目标识别
该功能在请求输入一张图片的同时,还要输入一句 prompt提示词。
模型将提取 prompt中与图片内容相关的词语作为标签结果进行目标识别。如下文,我们在prompt中写了beautiful girl in the image,模型就会识别图像中的beautiful girl并响应标签和目标位置。
注意,若使用了 prompt参数,caption_level参数将会失效,标签内容的详细程度将由提示词决定。
output = query(url_onject_detection, {
    "model": "Florence-2-large",
    "image": "path/to/image.jpg",
    "prompt": "beautiful girl in the image"
})
请求参数说明:
image:需要进行描述的图片,仅支持输入一张图片。prompt:辅助提示词。
请求结果如下:
{
  "num_objects": 2,
  "objects": [
    {
      "label": "beautiful girl",
      "bbox": [
        433.6640319824219, 702.0799560546875, 806.4000244140625,
        1239.679931640625
      ]
    },
    {
      "label": "beautiful girl",
      "bbox": [
        317.9520263671875, 913.2799682617188, 479.7440185546875, 1208.9599609375
      ]
    }
  ]
}
从请求结果中可以看到,模型发现 prompt中的beautiful girl的语义与图中的两个女孩子相近,因此模型识别到了这两个目标,给出了 bbox目标位置,同时标签使用我们在 prompt中的词语或短句。
该功能适合用于当您想对图中指定的主体对象进行标记时,模型会使用咱们 prompt内的词语作为 label给到具体的标记对象。
偷偷告诉您,我们发现热门影视动漫角色模型也能识别到哦(我们试过《星球大战》以及《海贼王》),可以尝试玩一下~
3. 标签结果后处理
在目标识别获得标签后,为了更好的看到标记效果,我们提供一个绘制结果的函数供参考,代码如下:
from PIL import Image, ImageDraw, ImageFont

def draw_labelled_bbox(image, bbox, label):
    draw = ImageDraw.Draw(image)

    # 设置字体
    font_size = 16  # 初始字体大小
    try:
        font = ImageFont.truetype("arial.ttf", font_size)  # 使用系统字体
    except IOError:
        font = ImageFont.load_default()  # 如果没有字体文件,使用默认字体

    draw.rectangle(bbox, outline="red", width=3)
    x1, y1, x2, y2 = bbox
    max_width = x2 - x1

    words = label.split()
    text_lines = []
    current_line = ""

    for word in words:
        test_line = f"{current_line} {word}".strip()
        line_width = draw.textlength(test_line, font=font)
        if line_width <= max_width:
            current_line = test_line
        else:
            text_lines.append(current_line)
            current_line = word
    if current_line:
        text_lines.append(current_line)

    line_height = font.getbbox("A")[3] - font.getbbox("A")[1]
    label_height = line_height * len(text_lines) + 4
    label_box = [x1, y1 - label_height, x2, y1]

    draw.rectangle(label_box, fill="red")
    text_y = y1 - label_height + 2
    for line in text_lines:
        draw.text((x1 + 2, text_y), line, fill="white", font=font)
        text_y += line_height

    return image


# 示例参数
image = Image.open("/path/to/your/image.jpg")
bbox = [148, 276, 290, 653]
label = "put your label here"

# 调用函数
image = draw_labelled_bbox(image, bbox, label)

# 展示与保存
image.show()
image.save("/path/to/save.jpg")
示例图片和具体的标签结果 obj为例:
{
  "label": "girl in white dress with pink flowers in field at sunset",
  "bbox": [
    433.6640319824219, 702.0799560546875, 806.4000244140625, 1239.679931640625
  ]
}
将结果转为python中的 dict类,我们使用如下代码调用函数:
image = loaded_image
label = obj['label']
bbox = obj['bbox']

image = draw_labelled_bbox(image, bbox, label)
image.show()
可得到标注结果如下图所示:

示例代码中有字体和调用相关的注释,您可以根据需求更改。
以上就是全部的教程了,祝您调用愉快!